Plan a Flight on a Computer, Fly It in the Field
Web-based grid flight planning is used during mission creation to set a pre-determined flight path. Planning a flight through the portal can cut down on the time pilots spend in the field. It allows pilots assigned to the mission to quickly view the mission and focus on mission competition.
Creating a flight plan

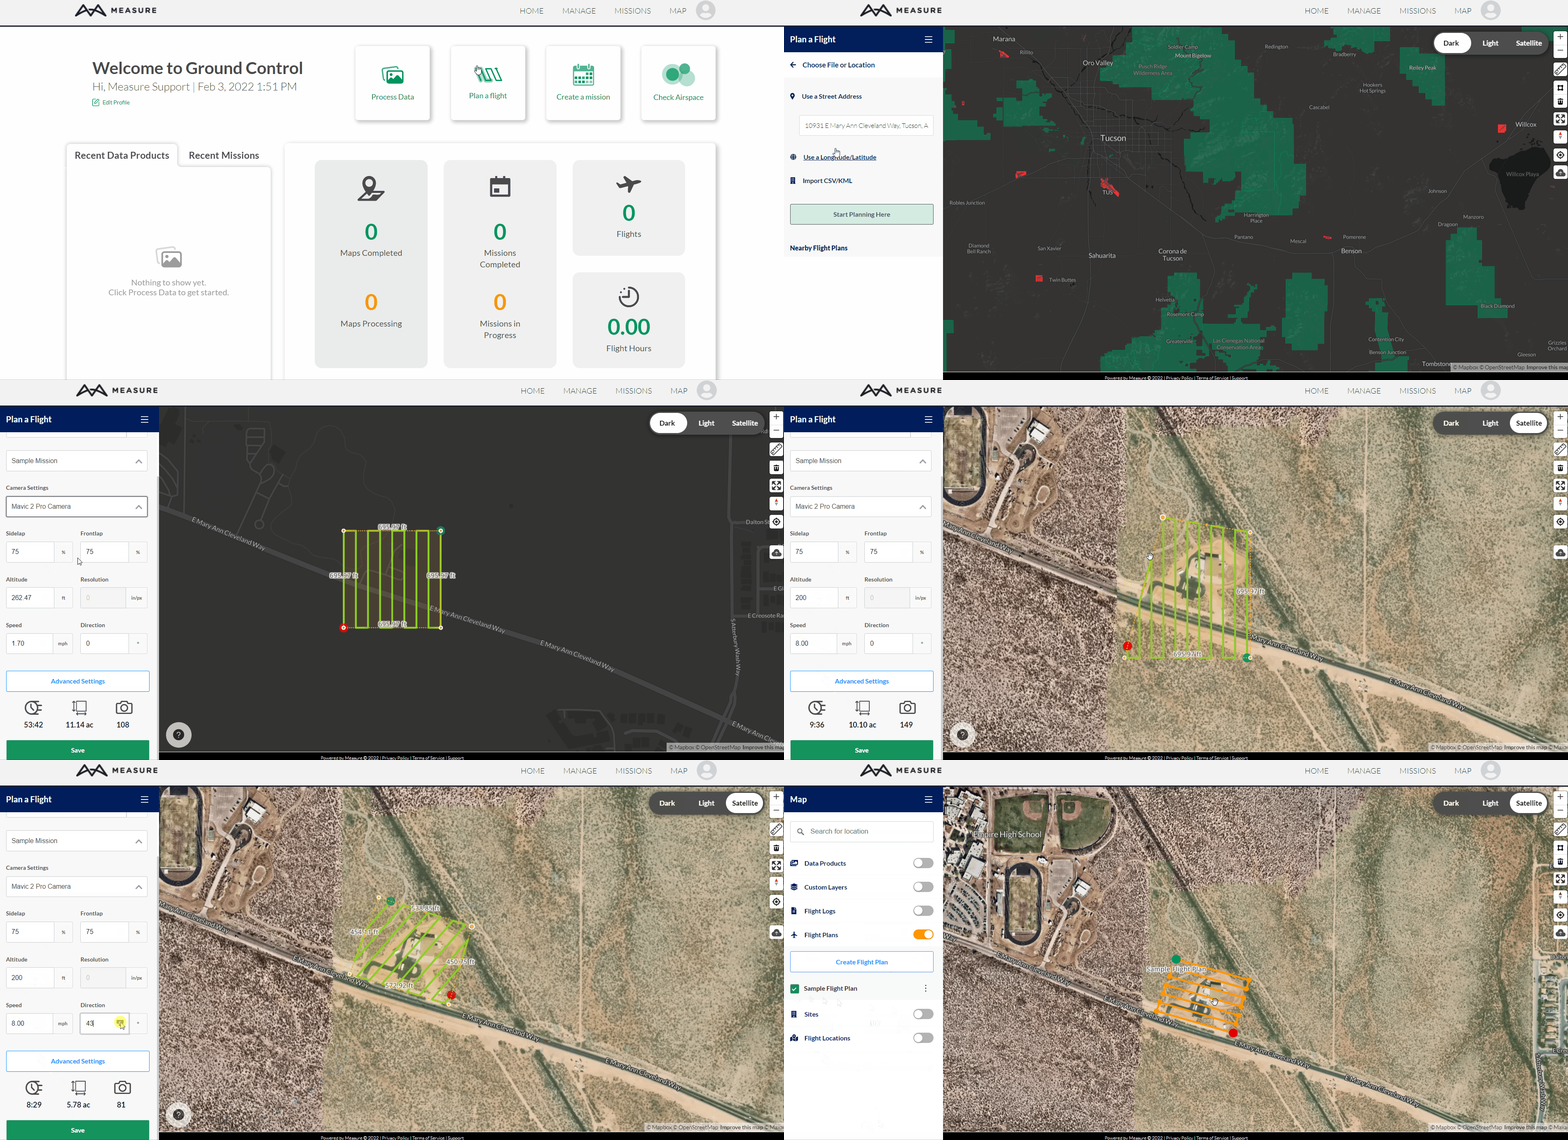
To create a new flight plan, first, create a mission. Once the mission is created, open up that mission and select Create Flight Plan in the Flight Plans window.
On the flight planning screen, choose the Location where the flight will be taking place. Users have the option to use the Street Address associated with the mission, the mission site's Longitude/Latitude Coordinates, or a CSV/KML File. After selecting the preferred location method click Start Planning Here.
By default, the map will center on the mission's location; to relocate, simply click on one of the corner anchors of the flight plan and wait for the cursor icon to change from the pointer to the cross cursor icon. Then, drag the anchor to the interest area's boundary corner.
Press on the orange dots at the midpoint of each side to add additional anchors.
Determine the Flight Plan Name and the Aircraft Camera Settings and adjust the flight path to the desired flight area. Please see this article to learn how to create a flight path via a CSV/KML file.
The flight planning tool automatically generates a Flight Area composed of an orange polygon overlaid with a green flight path. The orange area represents the area that would be captured if the flight is flown in nadir (ground-facing). The numbers shown on each side of the orange polygon represent the length of that side.
For better 3D Models, set the gimbal angle to -65° and turn the crosshatch feature on. This will allow the aircraft to capture more images of the side of structures.
To edit the flight path parameters, change the values in the Flight Settings Panel. The MGC Web Portal will suggest default parameters based on aircraft and camera. Many available settings can be edited, including:
- Picture Frontlap/Sidelap: Percent of each photo that will overlap with the adjacent photos.
- Altitude: The altitude used by the aircraft when flying. This value is the height above the ground directly below (AGL).
- Resolution(auto-calculated): Ground distance covered per pixel.
- Speed: Airspeed of the aircraft while flying each row.
- Flight Direction: Primary heading of aircraft during the flight. Each row will be flown with the aircraft flying at or away from the set heading.
- Advanced Settings:
-
- Drone Direction: Adjust the direction the drone will be facing relative to the flight. Useful for image capture of solar farms.
- Parallel - Flight plan faces the initial direction of the flight plan and maintains that direction throughout the entirety of the flight, even flying backward where necessary.
- Perpendicular - Drone faces perpendicular to the flight plan at 90 degrees, it attempts to face in a more northerly direction if possible.
- Course Aligned - Drone faces forward throughout the entire flight plan continuously updating direction to face the direction of a row.
- Drone Direction: Adjust the direction the drone will be facing relative to the flight. Useful for image capture of solar farms.
- End of Flight Behavior: Choose to have the drone return home or hover in place.
- Coverage Buffer: Scale mission size parameters up or down, as required.
-
-
- Gimbal Angle: Direction of the camera/sensor gimbal. A value of -90 represents a nadir (ground-facing flight).
- Margin: Additional capture buffer added to the lateral sides of the flight path.
-
- Crosshatch: Fly an extra grid overlaid on the default grid at a heading offset of 45° or 90° from the primary flight direction. Will double flight time and pictures captured. This can help improve 3D model quality.
- Switch Starting Waypoint: Switch the point used for the beginning/end of the grid flight.
The estimated flight calculations at the bottom of the screen display flight information for the flight as drawn, including estimated flight time, the area covered, and the estimated number of images to be captured.
As of this writing, only grid missions can be planned using the Measure Ground Control web portal. Waypoint mission planning will be available in the web portal in an upcoming release. Both grid and waypoint missions can be planned using the Measure Ground Control mobile app.
Related Articles
Have questions or feedback? Please contact support.groundcontrol@ageagle.com
