How to perform an inspection of a Wind turbine using Measure's assisted intelligent flight mode.
Introduction
Blade Inspect is a utility that helps a pilot capture imagery of a wind turbine. Blade inspect uses guided flight controls and automates the imagery capture (shutter, focus, F stop, and exposure settings) to achieve full blade capture on all 4 sides. Blade Inspect captured imagery is tagged by MGC so that it can be imported, organized, and inspected within Scopito. Measure provides seamless integration with Scopito for inspecting and annotating imagery of wind turbines.
Prerequisites for Blade Inspect
- A Measure Ground Control Enterprise account. If you currently do not have a Ground Control enterprise account but are interested in getting one, please email Sales.
- An iOS device running Ground Control (Android/smart controllers are currently unsupported)
- One of the following Drones/Camera setups:
- DJI Inspire 2 with X5S 15 mm camera
- DJI Phantom 4 Pro (P4P)
- DJI Matric 200/210 series with X5S 15 mm camera
Getting Started
- Login to Ground Control on your iOS device (if you haven't done so already).
- Connect your drone and smart controller to your iOS device.
- Go into Manual Fly mode by tapping the Fly button in the main menu of Ground Control.
Performing the Capture
- Tap the modes button in the bottom right corner to open up the intelligent flight modes panel.
- Tap Blade inspect
- You can also tap the heart within the blade inspect icon to add it as a favorite mode. This will add it to the fly screen for easier access.
- Enter the ID Number for your Turbine in the Turbine Number field. This information will later be used for sorting within Scopito.
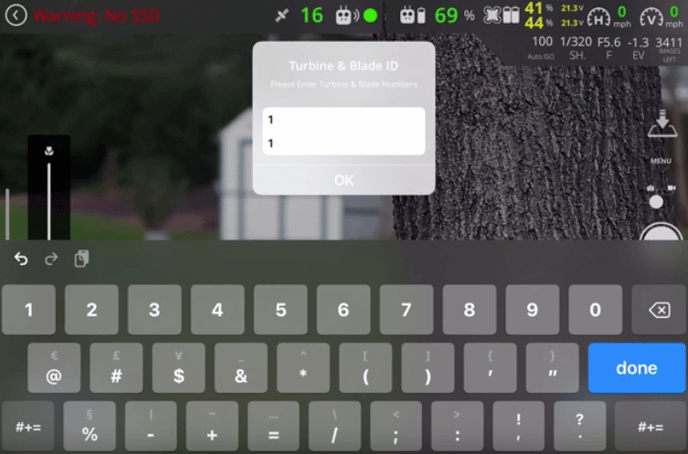
- Enter the Blade Number (1, if you are just starting the inspection) in the Blade Number field.
- Tap OK.
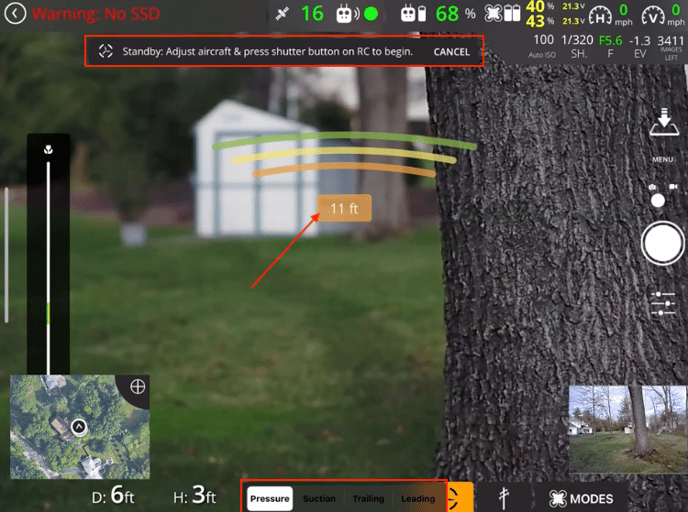
- From here, the Blade Inspect tool will go into Standby Mode. Please fly to the side of the first blade that you want to capture (the pressure side will be selected first by default, but you can choose the side you wish to begin with by choosing an option within the blade selection menu at the bottom of your screen). Ensure you are approximately 15 - 20 ft ( 4.5 - 6 m) away from the blade for best results.
NOTE:The photos for blade inspection do not need to be captured in a certain direction or order.
Images are aligned to blades in the diagram based on the GPS tags in images and proper sorting. - Push the shutter button on your controller to switch the blade inspect tool to Engaged Mode. (The drone will automatically be put in 'tripod' mode to make drone movement smoother when performing imagery capture).
- Start manually flying along the length of the blade side.
Note: The Blade Inspect tool does NOT account for any wind that the drone may experience. Be mindful of the distance between the drone and the blade.
9. The drone will auto-capture imagery as the drone moves along the length of the blade side. When you have finished capturing the blade side, press the shutter button to switch the drone back into standby mode.
10. From here select the next blade side you would like to capture via the blade selection menu at the bottom of the screen.
11. Repeat steps 6 - 9 to capture the additional sides of the blade (Suction, Trailing, and Leading)
12. Once you have captured all 4 blade sides, tap the orange blade icon at the bottom of the screen (or go to Modes -> Blade Inspect), to turn off Blade inspect. You've now successfully captured the blade!
13. To capture additional blades, repeat steps 1 - 12.
Viewing your Results
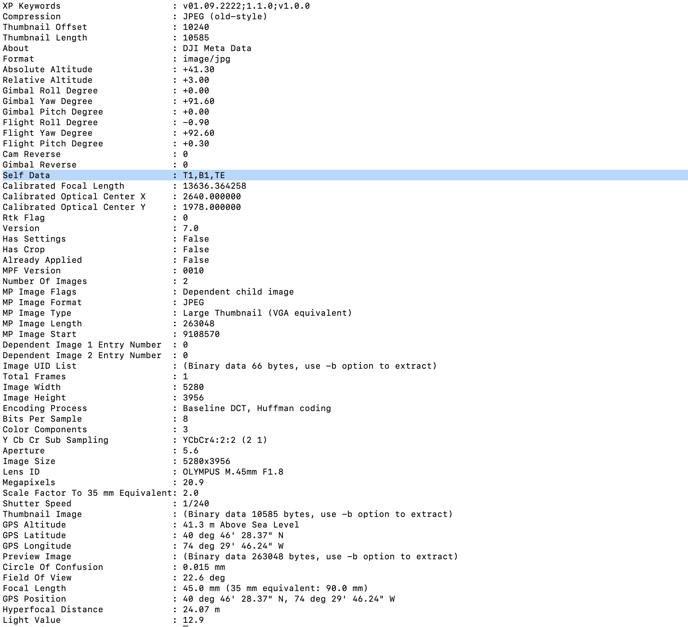
When you have finished capturing your imagery, you can see the sorting information in your imagery via an exif viewer:
Related Articles
Have questions or feedback? Please contact support.groundcontrol@ageagle.com